In this module we’re going to implement server-side sessions using Passport.js.
We are going to slightly revisit some of the code we’ve written so far. In particular, API routes.
I showed you how API routes can be used to very easily create a JSON API from Next.js, but we need more.
In particular, I need to be able to create server-side sessions, so we can send authenticated pages from the server instead of having to maybe call an API endpoints to see if we’re logged in and get the data. This is something that needs a custom server.
Basically we’re going to extend the capabilities that Next.js gives us by default.
Luckily Next.js allows us to do this thing quite seamlessly, and the official website provides many examples.
We’ll use Express. Why Express and not another Node.js server framework? Because Express is popular, lots of blog posts, StackOverflow answers and documentation exists around it - including my Express Handbook.
Let’s start by installing it:
npm install express
Now create a file named server.js, put it into the root folder of the Next.js project, and add this content:
const express = require('express')
const next = require('next')

const port = parseInt(process.env.PORT, 10) || 3000
const dev = process.env.NODE_ENV !== 'production'
const nextApp = next({ dev })
const handle = nextApp.getRequestHandler()

nextApp.prepare().then(() => {
  const server = express()

  server.all('*', (req, res) => {
    return handle(req, res)
  })

  server.listen(port, err => {
    if (err) throw err
    console.log(`> Ready on http://localhost:${port}`)
  })
})
Now change the package.json file content, in the scripts property you’ll see
"scripts": {
	"dev": "next",
	"build": "next build",
	"start": "next start"
},
Change it to
"scripts": {
	"dev": "node server.js",
	"build": "next build",
	"start": "NODE_ENV=production node server.js"
},
and restart npm run dev. Now, there’s a problem we need to be aware. Hot code reloading does not happen automatically any more with changes applied to server.js. So if you change that file, you need to restart the app manually.
This can be solved by using Nodemon, for example, a tool that restarts the Node process when it sees a change in your file.
Install nodemon if you haven’t already, then change that dev script to
"dev": "nodemon server.js",
to activate this functionality. The only problem is the server reloads on changes in our pages, too, which unfortunately breaks hot code reloading built-in into Next.js (as the app reloads). Anyway, it’s useful.
You might have noticed that in server.js I used require instead of the usual import syntax.
Why?
Turns out server.js needs to use the CommonJS syntax to use modules instead of ES Modules, because this file is not going through the webpack pipeline that Next.js usually does.
In other words, we need to do some changes in 2 files: database.js and model.js.
We need to move from the ES Modules syntax:
database.js
export const user = 'flaviocopes'
export const password = ''
export const host = 'localhost'
export const database = 'nextbnb'
to the CommonJS syntax:
database.js
const Database = {
  user: 'flaviocopes',
  password: '',
  host: 'localhost',
  database: 'nextbnb'
}

module.exports = Database
In model.js I changed the imports:
import bcrypt from 'bcrypt'
import { Sequelize, Model, DataTypes } from 'sequelize'
import { user, password, host, database } from './database.js'
to
const bcrypt = require('bcrypt')
const Sequelize = require('sequelize')

const Model = Sequelize.Model
const DataTypes = Sequelize.DataTypes

const Database = require('./database.js')
const { user, password, host, database } = Database
and instead of exporting the User class like this:
export class User extends Model {}
I changed it to
class User extends Model {}
and at the end I added
exports.User = User
exports.sequelize = sequelize
We weren’t exporting sequelize yet, but we’ll need this object later in this lesson.
OK!
I left this process into the lesson because I wanted to show you that these things can happen in a real world project, and you need to know how to solve them.
Let’s now jump to the meat of the lesson.
We’re going to implement sessions, and we start by installing some libraries we’ll need later on:
npm install express-session passport passport-local connect-session-sequelize
express-session is an Express middleware that represents a great way to handle sessions. We’ll use it to power our site-wide session management.
Here’s my tutorial on
express-session.
Let’s require it in the server.js file:
const session = require('express-session')
The first thing we’re going to do is to tell Express to use this middleware to handle sessions, right after the const server = express() line:
server.use(
	session({
		secret: '343ji43j4n3jn4jk3n', //enter a random string here
		resave: false,
		saveUninitialized: true,
		name: 'nextbnb',
		cookie: {
			secure: false, //CRITICAL on localhost
			maxAge: 30 * 24 * 60 * 60 * 1000 //30 days
		}
	})
)
Notice how I added a random string to the secret property, and I set the nextbnb name for the cookie.
I also set the cookies maxAge to 30 days. After 30 days, they will expire automatically and users will need to log in to the website.
I just miss something now: the session store. We need a place to store the session data.
By default, express-session stores the sessions in memory, but this is not practical (as every time you restart the application, the sessions reset) and not scalable, when you’ll get tons of users for your Airbnb clone.
To solve this, we need to add a store. There are many kinds of stores, some save sessions to disk, some to Redis, some to other places, but since we already have a Postgres database, why not use that?
That’s what we’re going to do.
In particular, we’re going to use connect-session-sequelize, as you might have guessed when we installed it using npm.
We require it at the top:
const SequelizeStore = require('connect-session-sequelize')(session.Store)
then we require the sequelize and User properties from the model:
const User = require('./model.js').User
const sequelize = require('./model.js').sequelize
and we use sequelize to configure the sessionStore variable:
const sessionStore = new SequelizeStore({
  db: sequelize
})
Finally, we add sessionStore to the session configuration:
server.use(
	session({
		secret: '343ji43j4n3jn4jk3n', //enter a random string here
		resave: false,
		saveUninitialized: true,
		name: 'nextbnb',
		cookie: {
			secure: false, //CRITICAL on localhost
			maxAge: 30 * 24 * 60 * 60 * 1000 //30 days
		},
		store: sessionStore
	})
)
Great!
Now our session store will store the sessions in the Sessions table in the database. We don’t have such table yet! The first time we run the application, add this line:
sessionStore.sync()
This will automatically create the table for us:
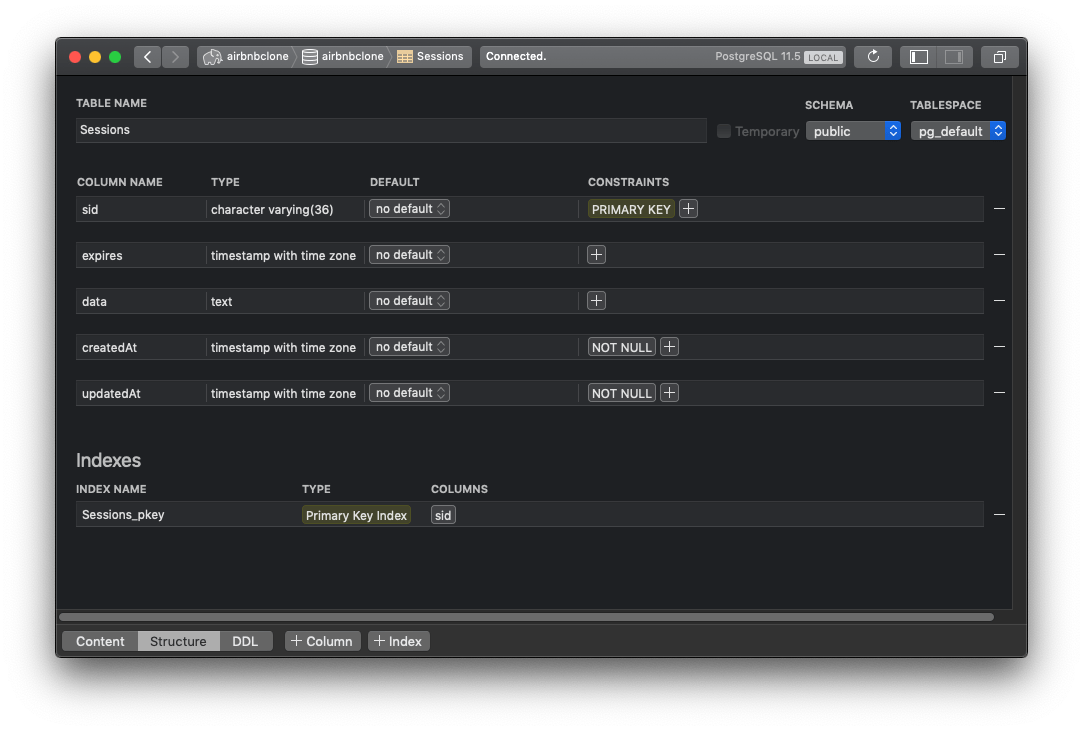
Once this is done, comment out that line, as you won’t need it any more.