In this module we’re going to expand on the work we’ve done so far.
In particular in the last module we added the date picker.
Once the person that want to book chooses a start date and an end date, we can calculate the cost of the stay.
Let’s keep things simple and just show a fixed price, without additional taxes and fees that the real Airbnb might factor in.
Also, we’ll keep the price equal for all days, and we’ll not have any discount for longer stays.
The price refers to the whole booking, with no additional bonus for multiple guests.
We’ll work on those things later.
Let’s store the price in the pages/houses.json file, after each title field:
[
  {
    "id": "2329",
    "hostName": "Anna",
    "picture": "/img/houses/1.jpg",
    "type": "Entire house",
    "town": "Ostuni",
    "title": "Beautiful flat in Ostuni!",
    "price": "50.00",
    //...
  },
  {
    "id": "1523",
    "picture": "/img/houses/2.jpg",
    "type": "Entire house",
    "town": "Isla Mujeres",
    "title": "The World Famous Seashell House ~ Casa Caracol",
    "price": "70.00",
    //...
  }
]
Now that we have the price information, we can present the information in the pages/houses/[id].js template.
The DateRangePicker.js component handles the startDate and endDate information. When those things change, we want to alert the parent component.
How?
We pass a function as a prop, and we call this function when they change.
So, we first assume that we have a datesChanged function passed as a prop to our DateRangePicker.js component:
components/DateRangePicker.js
export default ({ datesChanged }) => {

}
then we call this function, passing the start date and the end date for the stay of the user. Where do we call it? Well, we have 2 places where we do call setStartDate() and/or setEndDate(), and right after we do this call, we’ll call datesChanged().
We need to pay attention though: when we call setStartDate(), which is our update function from the hook const [startDate, setStartDate] = useState(today), we don’t immediately have access to the new startDate value - that’s only going to happen in the next rerender.
So when we call datesChanged(), we need to pass the same value we passed to setStartDate(). Same for setEndDate() of course.
Otherwise we’d reference the old value of the start/end date.
So basically in the first DayPickerInput onDayChange prop function becomes:
onDayChange={day => {
  setStartDate(day)
  const newEndDate = new Date(day)
  if (numberOfNightsBetweenDates(day, endDate) < 1) {
    newEndDate.setDate(newEndDate.getDate() + 1)
    setEndDate(newEndDate)
  }
  datesChanged(day, newEndDate)
}}
Notice that I moved const newEndDate = new Date(day) outside of the if block, so we can access it outside of it.
In the second DayPickerInput, onDayChange becomes:
onDayChange={day => {
  setEndDate(day)
  datesChanged(startDate, day)
}}
Great!
Now in pages/houses/[id].js, change the DateRangePicker component in the JSX and add a datesChanged prop, with a function as its value:
pages/houses/[id].js
<DateRangePicker />
becomes:
pages/houses/[id].js
<DateRangePicker
  datesChanged={(startDate, endDate) => {
    console.log(startDate, endDate)
  }}
/>
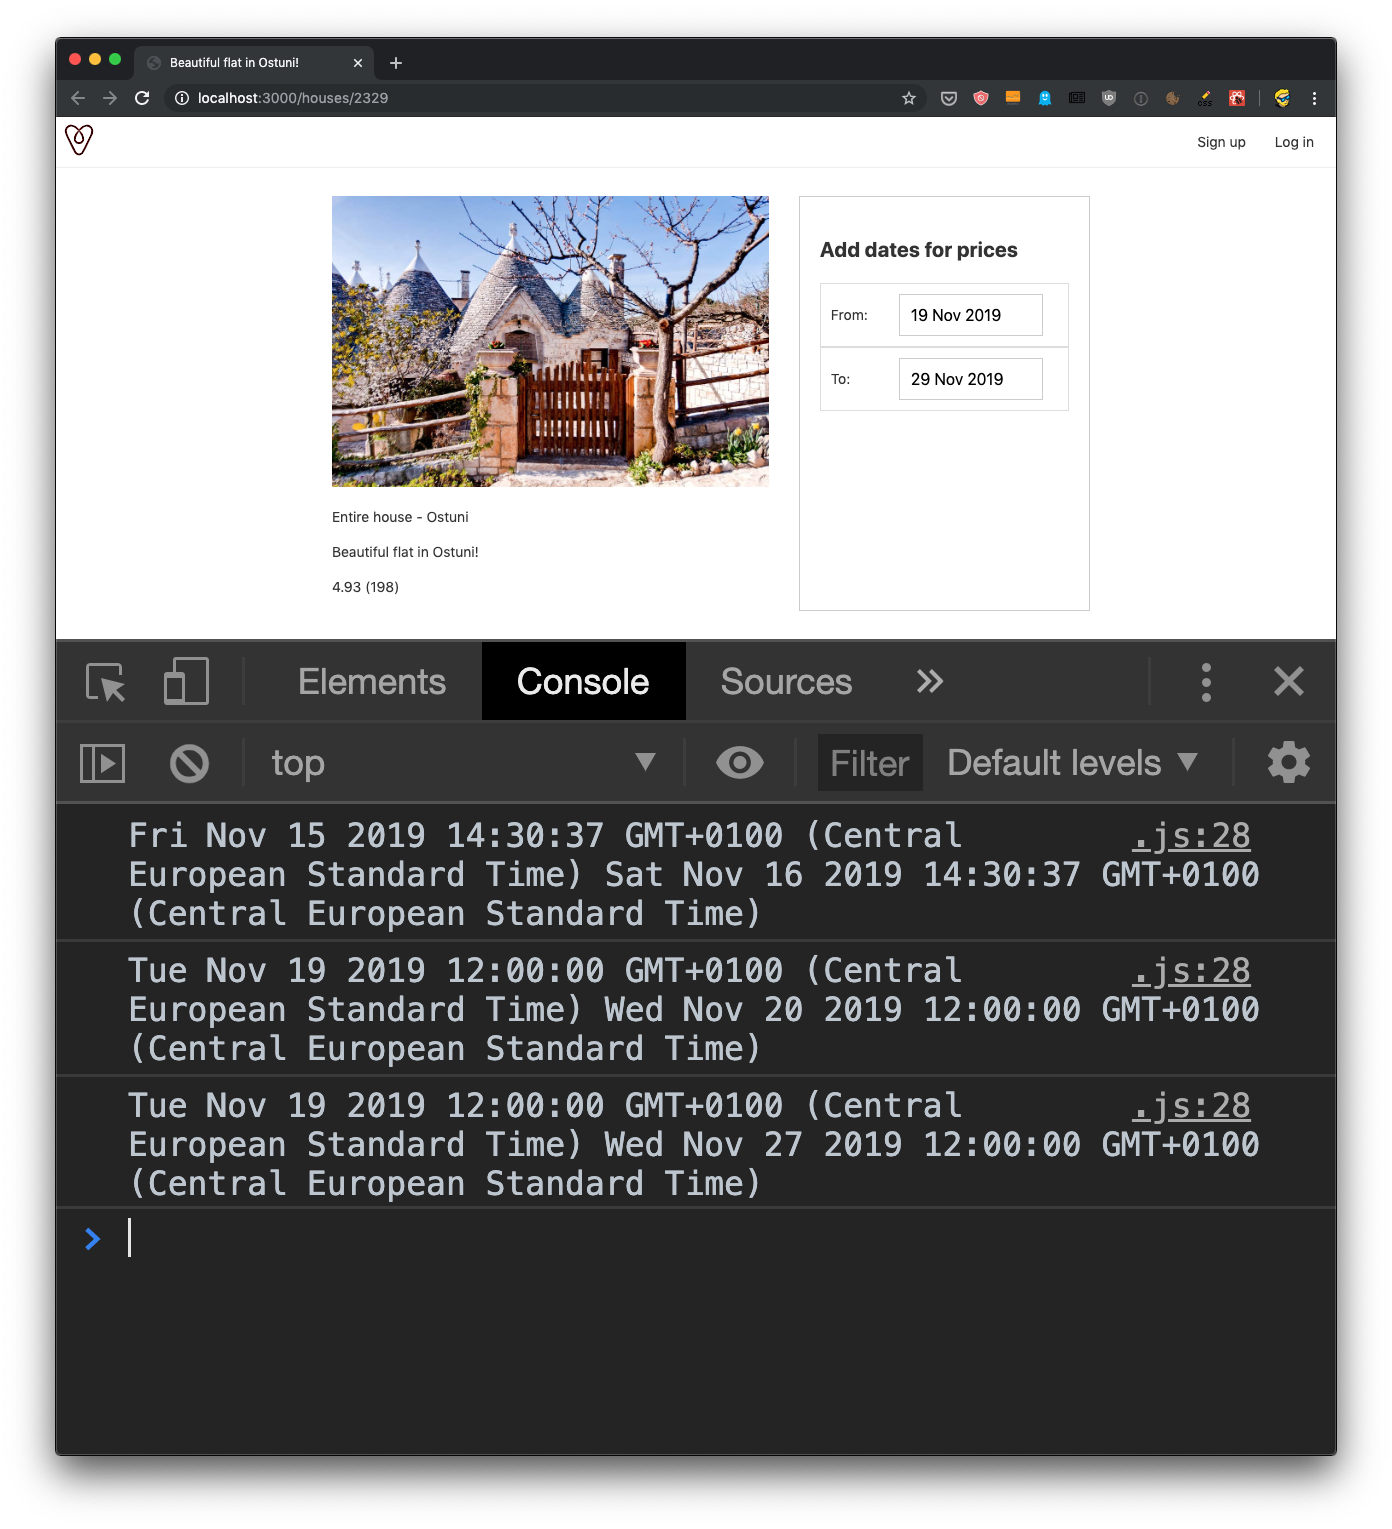
We just log the startDate and endDate values, and you can try it. Try changing the start or end date, and every time you change something, you should see it logged in the DevTools:
In the pages/houses/[id].js component, let’s use useState to create a new dateChosen state value. Remember that when we use hooks, we always need to define them in the body of the component, so we transform House, which now is an implicit return:
pages/houses/[id].js
const House = props => (
  <Layout>
    {/* ... */}
  </Layout>
)
to:
const House = props => {
  return (
    <Layout>
      {/* ... */}
    </Layout>
  )
}
and before the return line, we add:
const [dateChosen, setDateChosen] = useState(false)
to create this new dateChosen state property, which defaults to false:
const House = props => {
  const [dateChosen, setDateChosen] = useState(false)

  return (
    <Layout>
      {/* ... */}
    </Layout>
  )
}
Now inside the component JSX we can call setDateChosen() to update the value to true when datesChanged() is invoked inside DateRangePicker:
<DateRangePicker
  datesChanged={(startDate, endDate) => {
    console.log(startDate, endDate)
    setDateChosen(true)
  }}
/>
Great! Now we can add a block after the DateRangePicker component, that’s only shown if dateChosen is true. In there, we show the price for each individual night:
{dateChosen && (
  <div>
    <h2>Price per night</h2>
    <p>${props.house.price}</p>
  </div>
)}
Let’s also show the price for the total stay. I want to count the number of nights that a person had to pay to rent a house and sleep in it, depending on the checkin date, and the checkout date.
I looked at different solutions, and the one that gave me the least problems, considering all the issues with dates (including DST), was this: starting from the starting date, we add one day until the date represents a date after the end date.
I first clone the dates we are given, because dates are objects, and we get a reference to that object. If we forget this, using setDate() in the function would also affect the variable outside of this function, which would change the date in the datepicker!
Here’s the code:
const calcNumberOfNightsBetweenDates = (startDate, endDate) => {
  const start = new Date(startDate) //clone
  const end = new Date(endDate) //clone
  let dayCount = 0

  while(end > start) {
    dayCount++
    start.setDate(start.getDate() + 1)
  }

  return dayCount
}
I define a new component state property using:
const [numberOfNightsBetweenDates, setNumberOfNightsBetweenDates] = useState(0)
and we call setNumberOfNightsBetweenDates() inside the datesChanged prop of DateRangePicker:
<DateRangePicker
  datesChanged={(startDate, endDate) => {
    setNumberOfNightsBetweenDates(
      calcNumberOfNightsBetweenDates(startDate, endDate)
    )
    setDateChosen(true)
  }}
/>
Great, now we have the number of days we want to book in numberOfNightsBetweenDates, and I’m going to use it to calculate the cost, to display it to the user using conditional rendering:
{dateChosen && (
  <div>
    <h2>Price per night</h2>
    <p>${props.house.price}</p>
    <h2>Total price for booking</h2>
    <p>
      ${(numberOfNightsBetweenDates * props.house.price).toFixed(2)}
    </p>
  </div>
)}
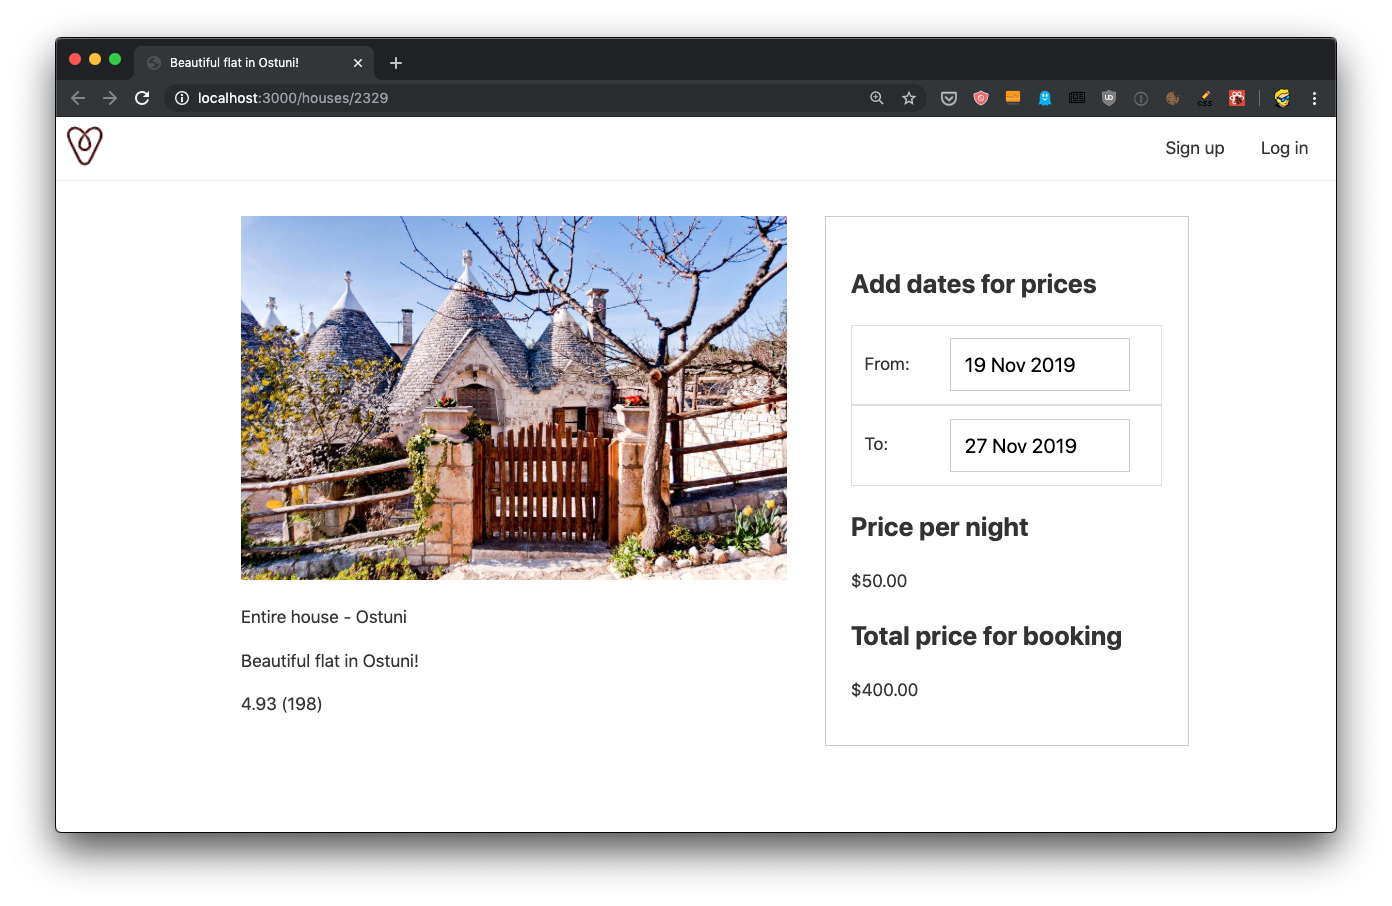
That’s the result we should have right now:
We can also add a new button at the end:
{dateChosen && (
  <div>
    <h2>Price per night</h2>
    <p>${props.house.price}</p>
    <h2>Total price for booking</h2>
    <p>
      ${(numberOfNightsBetweenDates * props.house.price).toFixed(2)}
    </p>
    <button className="reserve">Reserve</button>
  </div>
)}
and let’s style it a bit in the CSS below:
button {
  background-color: rgb(255, 90, 95);
  color: white;
  font-size: 13px;
  width: 100%;
  border: none;
  height: 40px;
  border-radius: 4px;
  cursor: pointer;
}
Once people click the “Reserve” button, we are soon going to do 2 things based on the logged in state.
If you’re logged in, we’ll go on with the registration process, and if you are not logged in, we’re going through the login process.
I know, we don’t have a login management process, yet!
That’s what we’re going to do in the next lessons.
The code for this lesson is available at https://github.com/flaviocopes/airbnb-clone-react-nextjs/commit/e25c5c20e7566b418af741276abc987bac217f15